Pages

Monday, February 15, 2016

It's My Party!

Hello stampers!  I wanted to let you know about a very special event that is coming up this Sunday, February 21, 2016.  It's my birthday!  And because I care about all of you that have taken the time to be my follower the past years or even recently, I want to give one person a gift from me!  Now through Saturday night (Feb 20th), 11:59 PM, anyone that does at least 2 out of the 3 of the following, and leaves a comment, to let me know, is eligible to be in a free drawing for a free stamp set.

The 3 things are:
  • Become a follower of this blog (if you are not already) This will require a gmail email address
  • Share a link to this post on social media (Facebook, Instagram, Twitter.  And if you add to more than 1 form of social media, it can count as 2 requirements)
  • Add the grab a button and add me to your own blog
  • Use the button shown on the right column


Once you have done at least 2 out of  3 of these things, please leave me a comment below so I can add you into the drawing.  It's pretty simple!  The item that I will be giving away for my birthday celebration is:
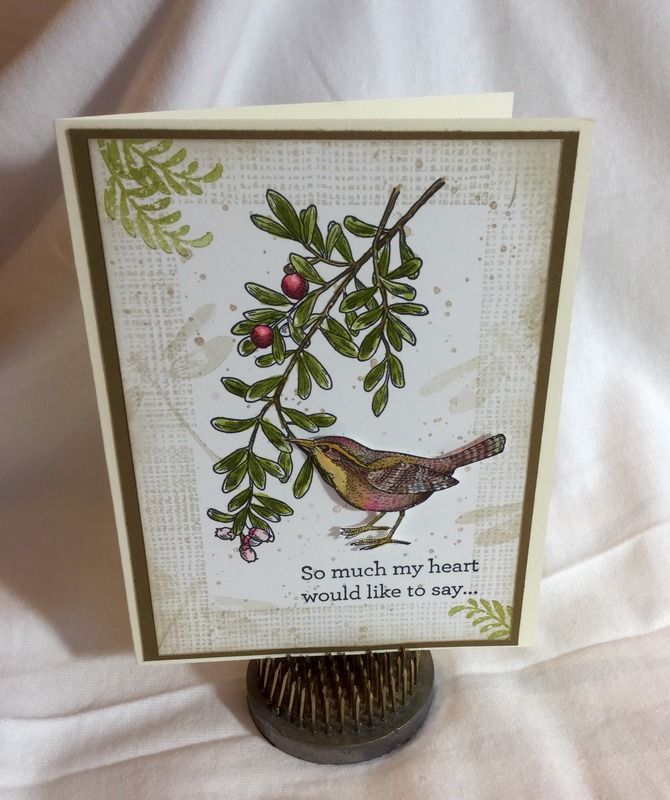


Sky is the Limit

This will be a clear mount, brand new stamp set. I can mail it to any anyone with an address in the United States.  Along with the stamp set I will include a card made with the stamps of this set and enough supplies for you to make 3 more cards for yourself!  It's a pretty great deal.

Here is the finished card sample of the card kit I will including.  Along with the limited time stamp set, I will also include a generous sampling of the limited Perfectly Artistic Designer Paper that is also going, going, gone as of today.


What this all means is, today, Feb 15, 2016, is the very last day you can order from Stampin' Up and receive either this stamp set or the Perfectly Artistic Designer Paper as a free item for every $50 purchase.  This means, ordering it today or entering in my drawing may be the last opportunity you have to own it for yourself.

Thank you for being with me through all the transitions of this blog.  I truly appreciate you and hope you will continue to come visit for more content and ideas.  In the upcoming weeks, I plan on sharing some step by step and video tutorials, as well as more giveaways and fun things.

Also, because our SaleABration is not over yet, stay tuned this week as I share a few NEW items, not yet revealed that will also be FREE with any $50 purchase.
Built for Free Using: My Stampin Blog

Sunday, February 14, 2016

Happy Valentine's Day

Happy Love Day to all my readers.  It's been a good weekend so far.  My husband picked me up early from work on Friday and he and I took a quick trip to Portland and back.  Sometimes a fun road trip is just what a couple needs.  We were cooped up in his truck together for 14 hours round trip.  That amounts to a lot of conversation, laughing and memory making without very much outside interruptions.  We both had a great time!  He also gave me this lovely little silver necklace that he had engraved for me.


February is a special month for me.  Not only is it Valentine's Month, but it's also my Birthday Month!  I will talk more about that tomorrow, so be sure to come back and visit me again.  There may be a very special opportunity for you!

I thought I would take a minute and share a card I made as appreciation for the orders I received this month.  I got the idea from Robyn at My Pink Stamper.  She's my Stampin' Up up-line, and a super sweetheart herself.  Pretty and yet, so very simple.  I will be sure to share the supplies used at the end of this post.

Here are some fun little treat pouches that I also made.  I also took this idea from My Pink Stamper, but instead of using little bags, I created the pouches out of the Mini Treat Bag Thinlit Dies.  LOVE this die, and recommend it for fun things like this.


I hope you've enjoyed checking in today to see what I have to offer.  Please be sure to check back tomorrow, for a special announcement and fun giveaway!  You won't want to miss out!


Built for Free Using: My Stampin Blog

Sunday, February 7, 2016

So Much My Heart...

I work a full time job that often takes me away from the opportunity to sit in my craft room and, well, be creative. I have tried in the last week, in between long shifts and short, sleepless nights, to steal away and play with ink and paper.  Today, however, I had a special purpose in my card making.  A co-worker had to leave work suddenly last Thursday to go to her fathers deathbed.  Having lost my own mother just 2 years ago, my heart went out to her and what she will be feeling and thinking for the next few weeks and months.  It's never a wrong thing to make a card. Cards don't fix problems, but they are an expression of love and concern. Today I wanted to create a card that I hope will send that message without saying too much.

I decided to use 3 different stamp sets, that I think work together very well. Gorgeous Grunge, An Open Heart, and Awesomely Artistic.  I cut the bird out and popped it on the front to give the card dimension.  I really love the soft and subtle colors.

Built for Free Using: My Stampin Blog

Sunday, January 31, 2016

Just For You

Happy Sunday morning.  I though it would be fun to share a card I made for the February swap.  There was some involved die cutting, (30 card swap) but once that was completed, it turned out to be a fairly simple card to put together that I don't think appears to be simple.  I love the new Botanical collection in the Occasions catalog.  It can look floral to jungle, depending on how you want to use it.  Look how nice the sentiment stamped too!  I was skeptical that a stamp area that large would have some overly lighter sections or not stamp at all.  This has often been my experience in the past with many stamps I have tried.  This worked great.  All 30 sentiments I stamped worked great without any redo's.

Once again I would like to remind everyone that we have Sale-A-Bration going on with Stampin' Up, and that means for every $50 spent from our annual and occasions catalogs, you get to choose one free item.  It's also the best time to be a hostess or become a demonstrator.  There are so many more benefits than before.  I would be happy to help you out!  My store is open 24/7 and I would be so happy to help you with your crafting adventure.
Built for Free Using: My Stampin Blog

Thursday, January 28, 2016

Friends and Flowers Stamp Set

I thought I would make a brief post to share a new stamp set in the Occasions catalog called Friends and Flowers.  When I first saw the set, I wasn't convinced it was one I would want,  but then I started to see possibilities.  I have seen bunnies and other critters, flowers...all kinds of things created with the different elements.  In my January swap, here is the card I created. 
It resulted in a very flat, although layered card.  Kind of pretty I think!  I used the Festive Flower Builder punch to cut out the flower petals.


Built for Free Using: My Stampin Blog

Tuesday, January 26, 2016

Craft Room Update

Good morning everyone!  I confess that I have been living under a pile of craft supplies that were unorganized, dumped into boxes and bins...everything in disarray; it was time to come up with a new plan!  Since I joined Stampin' Up, I have been sensitive about keeping my supplies separated from the rest of my craft things.  And, I have a whole lotta craft things from previous design teams, hoarding, etc.  :)  I think I had completely lost my mojo and was more in a collecting mode as opposed to a creating mood.  I had some ideas based off things I had seen on pinterest and other blogs about creating a craft table out of IKEA cubes.  I am lucky enough to have a room in my home that is my own to go to and create, albeit a fairly small space.  I had already made it into my hide-away last year, but I also was not crafting at that time and just wanted things to have a place to go that was more organized.  But, to actually work in this space was difficult because the room on my little desk was limited and I confess to being a messy creater.  Stuff gets everywhere!

I was very concerned that adding a craft table was going to make my room impossibly small and that would defeat the purpose of my even wanting to be in this room.  But, insanity won out, as usual, and I went with the change.

We don't have an IKEA close by, but my husband goes to Salt Lake City frequently (nearly 6 hours away) and so I gave him my shopping list and he bought the items and brought them home.  It took me about a week to shovel through, sort and throw old stuff out.  I also did some purging of things I haven't used in the last couple years, let alone the last 15 years and this was the result.  It's kind of crowded in here, but it still has a fun and creative vibe...and this extra work space allows me to get kind of messy without becoming overcome with mess.
This the vantage point looking into my room from the doorway.  It's a bit close in there, but I was still able to fit my flowery chair in there.  I was worried it was going to work!

Here is my IKEA cubes work table from another angle.  I used 3 cubes, a long one and 2 shorter ones.  I was able to make a knee well this way and can store a bench underneath for when I want to sit down.  Which is pretty much all the time.  All of my Stampin' Up papers are organized with tabbed inserts, so I keep them straight and handy.

This is my old work area.  As you can see, it wasn't much to work with but now is a great place for my die cutting.  It just worked out great for a swap I did where I had to cut everything in multiples of 30!

We bought a few additional IKEA crates to slide into the cubes as drawers.  I splurged as well and bought this lock down punch shelf that fits right in there,

Thursday, January 21, 2016

It's a New Year! Let's have a Sale-A-Bration!

Hello Readers!  I want to welcome you back to my blog and tell you about all the fun things going on right now with Stampin' Up!  Now through May 31st, for every $50 purchased, you can choose a FREE item from our Sale-A-Bration catalog.  These are new and exclusive items that you can view right HERE.  Additionally, our new Occasions Catalog is also available and it is filled with lots and lots of new stamp sets, designer papers, die sets and products that are not currently in our annual catalog.  You can look that catalog over HERE.  And if you decide to place an order with me and your purchase is $150 or more, you qualify for even more free product along with the 3 "free" items.

Here is an example of card that I made with the new Birthday Blooms stamp set in our Occasions catalog.  I used blender pens to "paint" the image with ink.


Right now is the best time ever to become a demonstrator.  And before I go too far along those lines I'd like to mention that it is perfectly fine to sign up as a hobbyist.  This means you don't have to sell to anyone other than yourself.  Of course, if you'd like to demonstrate and share these great products, it's a wonderful way to make a business sharing what you already love.  Normally, to sign up, for $99 you can choose any products you like that value $125.00.    But, during Sale-A-Bration, now through May 31st, you get $155.00 worth of product. What a great way to get started.  If you would like to take this opportunity, please follow this Join my Team link.

Here are some benefits to consider:
*No pressure to sell
*Buy $99 kit and receive your own personal discount on all future orders while a demonstrator!
*Be your own customer for the discount
*Learn how to run as a business or as a hobby demonstrator!
*Join a group of wonderful new friends!
Built for Free Using: My Stampin Blog

Sunday, October 25, 2015

And to all a Good Night

Hello Friends!  I finally decided that I couldn't wait for time to become available, and I would just make some!  I decided to get my fingers all covered in ink this weekend...and that's exactly what happened.  Here is my first card in a long time, and I decided to make it a Christmas card.  Yes, it's only October, and I somehow skipped over Thanksgiving, but I will come back to that later.  Promise!

Here is what I came up with!  And today, I am also going to include a photo tutorial.


And here is how I created it:

Step 1:
On a 3.75" x 5" piece of Whisper White cardstock, using your sponge, lightly sponge on Soft Sky ink.  Generally, I do this by inking up my sponge, sponging on scratch paper and then rubbing in from the edges until the entire cardstock is covered.  Something like this.
Step 2:
Punch out a 2.5" circle on a post-it, making sure to get some of the adhesive strip.  Adhere this to the cardstock face.  This will be your moon.  Make sure from here on out, you keep this firmly in place as you continue to add layers of ink.  The next color of ink will be Pool Party.  Once again, start out the outside edge and work in towards the moon.  Try to leave some space around the moon, to form a halo.  Use your best judgment on this, to find the tone you like the best.

Step 3:
The next layer of ink will be Marina Mist.  Using the same technique as before.

Blending and blending by rubbing in circles, makes a nice blended and burnished effect.
Step 4:
The final color for the night sky is Night of Navy.  Be careful and add light layers of this color as it can be very dramatic.  I love the effect though!
 
 As you can see, starting from the outside on all edges and working into towards the moon halo, will give you the best effect.

Step 5:
Now we will be adding the illusion of land.  Using your sponge, dab into some Mossy Meadow ink and rub it into the bottom section of the card.  This will give our trees a place to land so they won't look as though they are floating in space.

Step 6:
Using the tree stamp in the Wonderland Stamp Set and Archival Black ink, it's time to stamp the trees in the foreground.  These will be the darkest color and you will NOT want to stamp off your ink first.  Place the trees in varying heights for more interest.

Step 7:
To give the illusion of depth it's now time to add the trees in the background.  Do this by inking your stamp and stamping off onto your scratch paper one time.  Randomly stamp in the gaps in between your foreground trees.  You should be able to get 2-3 trees from one inking.

Step 8:
Now you can remove the post it moon from your cardstock.  Using the sponge, lightly add some shadows (or hazy clouds) over your moon.  Nice effect, isn't it?

 Step 9:
Using Santa and his reindeer stamp from the Cozy Christmas Stamps set and Archival Black ink, stamp your image over the moon.

Step 10:
Finish your card off by mounting it onto Whisper White cardstock and then onto a Night of Navy card base.  
I think a sentiment stamped onto vellum paper would be a nice touch for the front, but I don't have any vellum and I kind of like it just the way it is.  However, inside the card, I would recommend adding some Whisper White card stock and a sentiment to finish off your card.

What do you think?  Was this tutorial helpful?  This method would work with just about any sky or background effect you are going for.  But, if you'd like to duplicate and want to purchase the materials, you can do so with the links I will include.

Built for Free Using: My Stampin Blog

Wednesday, October 21, 2015

Pink Paper Pumpkin

Hello All!  It has certainly been a long time since I have shared anything with you on my blog.  I need to remedy this and be more active over here.  Things are going well; I just have been busier than usual at my full time job that I haven't been able to do what I really want to do....craft!

Today, I received my October's Paper Pumpkin monthly subscription.  This month it is particularly important because $1 of every subscription was donated to breast cancer research.  With my older sister being in remission with this particular disease, I am very much appreciative of everyone's contribution.

I waited until this evening to open my box and share it with you all.  I'd love some feedback on what you think of this months kit.  I will make something soon with it, to share with you all.  If you'd like to get in on the Paper Pumpkin phenomenon, you simply need to follow my link above.  It's a fun way to get a sampling of what Stampin' Up! is all about without a big time financial investment on a room full of craft supplies.  (you know, like I do!)


If anyone is interested in purchasing from Stampin' Up! now is a very good time.  This week, but only through this Friday 10/23/2015, all stamp sets are 15% off.  I confess I made a wish list and have ordered for myself.  I plan on sharing some fun things with you very soon!