 |
| see our retiring products Shop NOW |

Tuesday, November 17, 2015
Sunday, October 25, 2015
And to all a Good Night
Hello Friends! I finally decided that I couldn't wait for time to become available, and I would just make some! I decided to get my fingers all covered in ink this weekend...and that's exactly what happened. Here is my first card in a long time, and I decided to make it a Christmas card. Yes, it's only October, and I somehow skipped over Thanksgiving, but I will come back to that later. Promise!
Here is what I came up with! And today, I am also going to include a photo tutorial.

Step 1:
On a 3.75" x 5" piece of Whisper White cardstock, using your sponge, lightly sponge on Soft Sky ink. Generally, I do this by inking up my sponge, sponging on scratch paper and then rubbing in from the edges until the entire cardstock is covered. Something like this.


Blending and blending by rubbing in circles, makes a nice blended and burnished effect.


Step 5:
Now we will be adding the illusion of land. Using your sponge, dab into some Mossy Meadow ink and rub it into the bottom section of the card. This will give our trees a place to land so they won't look as though they are floating in space.
 Step 6:
Using the tree stamp in the Wonderland Stamp Set and Archival Black ink, it's time to stamp the trees in the foreground. These will be the darkest color and you will NOT want to stamp off your ink first. Place the trees in varying heights for more interest.
 Step 7:
To give the illusion of depth it's now time to add the trees in the background. Do this by inking your stamp and stamping off onto your scratch paper one time. Randomly stamp in the gaps in between your foreground trees. You should be able to get 2-3 trees from one inking.


Here is what I came up with! And today, I am also going to include a photo tutorial.

And here is how I created it:
Step 1:
On a 3.75" x 5" piece of Whisper White cardstock, using your sponge, lightly sponge on Soft Sky ink. Generally, I do this by inking up my sponge, sponging on scratch paper and then rubbing in from the edges until the entire cardstock is covered. Something like this.

Step 2:
Punch out a 2.5" circle on a post-it, making sure to get some of the adhesive strip. Adhere this to the cardstock face. This will be your moon. Make sure from here on out, you keep this firmly in place as you continue to add layers of ink. The next color of ink will be Pool Party. Once again, start out the outside edge and work in towards the moon. Try to leave some space around the moon, to form a halo. Use your best judgment on this, to find the tone you like the best.

Step 3:
The next layer of ink will be Marina Mist. Using the same technique as before.


Step 4:
The final color for the night sky is Night of Navy. Be careful and add light layers of this color as it can be very dramatic. I love the effect though!

As you can see, starting from the outside on all edges and working into towards the moon halo, will give you the best effect.

Now we will be adding the illusion of land. Using your sponge, dab into some Mossy Meadow ink and rub it into the bottom section of the card. This will give our trees a place to land so they won't look as though they are floating in space.

Using the tree stamp in the Wonderland Stamp Set and Archival Black ink, it's time to stamp the trees in the foreground. These will be the darkest color and you will NOT want to stamp off your ink first. Place the trees in varying heights for more interest.

To give the illusion of depth it's now time to add the trees in the background. Do this by inking your stamp and stamping off onto your scratch paper one time. Randomly stamp in the gaps in between your foreground trees. You should be able to get 2-3 trees from one inking.

Step 8:
Now you can remove the post it moon from your cardstock. Using the sponge, lightly add some shadows (or hazy clouds) over your moon. Nice effect, isn't it?

Step 9:
Using Santa and his reindeer stamp from the Cozy Christmas Stamps set and Archival Black ink, stamp your image over the moon.

Step 10:
Finish your card off by mounting it onto Whisper White cardstock and then onto a Night of Navy card base.

I think a sentiment stamped onto vellum paper would be a nice touch for the front, but I don't have any vellum and I kind of like it just the way it is. However, inside the card, I would recommend adding some Whisper White card stock and a sentiment to finish off your card.
What do you think? Was this tutorial helpful? This method would work with just about any sky or background effect you are going for. But, if you'd like to duplicate and want to purchase the materials, you can do so with the links I will include.
Wednesday, October 21, 2015
Pink Paper Pumpkin
Hello All! It has certainly been a long time since I have shared anything with you on my blog. I need to remedy this and be more active over here. Things are going well; I just have been busier than usual at my full time job that I haven't been able to do what I really want to do....craft!
Today, I received my October's Paper Pumpkin monthly subscription. This month it is particularly important because $1 of every subscription was donated to breast cancer research. With my older sister being in remission with this particular disease, I am very much appreciative of everyone's contribution.
I waited until this evening to open my box and share it with you all. I'd love some feedback on what you think of this months kit. I will make something soon with it, to share with you all. If you'd like to get in on the Paper Pumpkin phenomenon, you simply need to follow my link above. It's a fun way to get a sampling of what Stampin' Up! is all about without a big time financial investment on a room full of craft supplies. (you know, like I do!)
If anyone is interested in purchasing from Stampin' Up! now is a very good time. This week, but only through this Friday 10/23/2015, all stamp sets are 15% off. I confess I made a wish list and have ordered for myself. I plan on sharing some fun things with you very soon!
Monday, September 21, 2015
"Fangtastic"
I am beyond happy with the design of my blog. Ashley did a great job, didn't she? I haven't had a chance to share anything lately because I was on a much needed vacation to....Hawaii! Yes! My son is stationed over there in the Coast Guard and I was lucky enough to spend some time with him and his lovely wife. Now, I am home again and ready to get motivated and share with you all some projects, videos and all kinds of fun crafty fun. Who's with me?
Before my trip, I did manage to complete a card for my team's card swap. The theme was fall or Halloween. Of course I wanted to go with the Halloween version. It's a little early for spooks, but I couldn't wait to share.
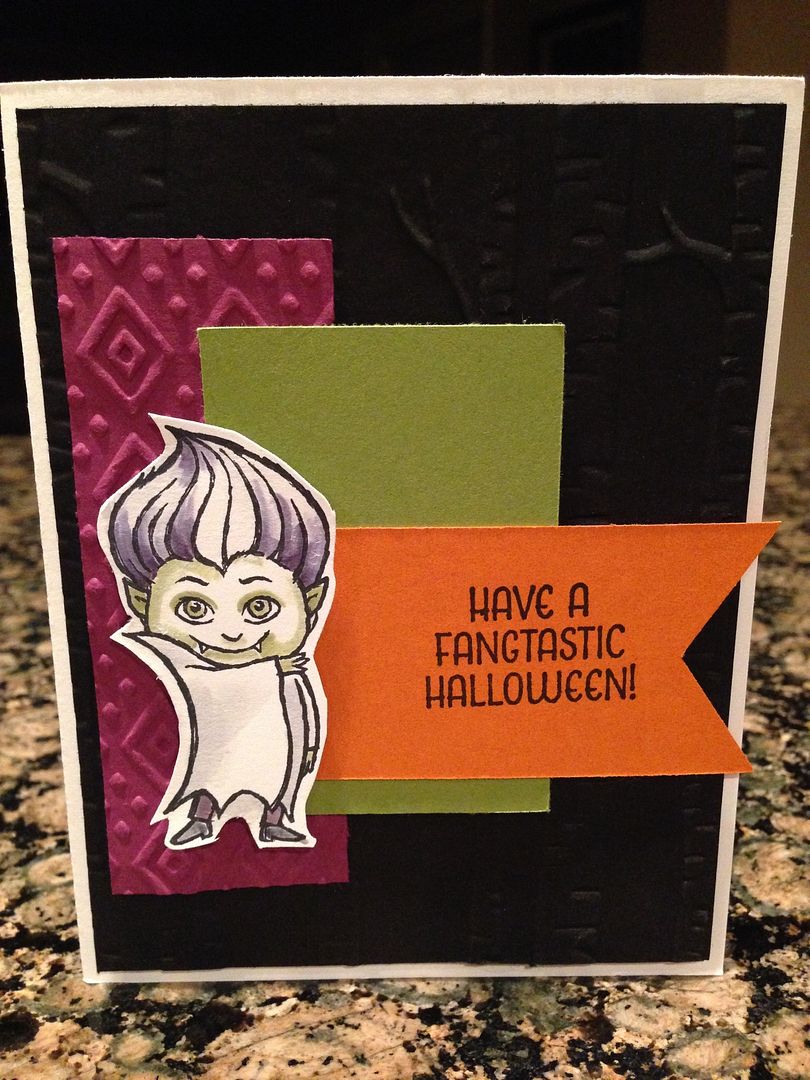
This is a new stamp set now available in our Holiday catalog. If you'd like to check it out and the other fun items I used, please pop on over to my store and check it out!
Before my trip, I did manage to complete a card for my team's card swap. The theme was fall or Halloween. Of course I wanted to go with the Halloween version. It's a little early for spooks, but I couldn't wait to share.
This is a new stamp set now available in our Holiday catalog. If you'd like to check it out and the other fun items I used, please pop on over to my store and check it out!
Monday, August 31, 2015
Stampin' Up! Holiday Catalog
I admit I have been a little lax over here on my blog the past week or
so. I am not digging the design and it has been depressing me to come
look at it. Silly reasoning, I know. But, I am super excited that
Ashley from Dream Up Studios
is, as we speak, working on making me a fresh new design. YAY! I hope
to have the new design up and wowing everyone by this weekend. :)
Tomorrow is the day we can finally order from the new holiday catalog from Stampin Up! I am putting together a special order as well and if you'd like to get in on that, please follow my 24/7 shopping link above and when you place your order, use hostess code KPDNU6AY. Anyone that orders with me by Friday, September 7th, will receive a little thank you gift from me. If by chance your order is $150 or more, then make sure not to use the Hostess Code, but instead you qualify for free product from Stampin' Up! And that is a total Woohoo moment. If you'd like more information about this, feel free to email me or leave a comment below.

Tomorrow is the day we can finally order from the new holiday catalog from Stampin Up! I am putting together a special order as well and if you'd like to get in on that, please follow my 24/7 shopping link above and when you place your order, use hostess code KPDNU6AY. Anyone that orders with me by Friday, September 7th, will receive a little thank you gift from me. If by chance your order is $150 or more, then make sure not to use the Hostess Code, but instead you qualify for free product from Stampin' Up! And that is a total Woohoo moment. If you'd like more information about this, feel free to email me or leave a comment below.

Monday, August 3, 2015
Beautiful Bunch
I created a card today that I am going to demo as a make and take at my workshop this Saturday. I used the stamp set Beautiful Bunch. Kind of cute isn't it? The colors are Blushing Bride, Melon Mambo and Pear Pizzazz. I also used the Gorgeous Grunge back ground stamps to give it that cute speckled look on the back paper and the beautiful Designer Series patterned paper, English Garden.


What do you think? Would you like to do this card as a make and take? I'd love to hear from you, please leave a comment below.
Sunday, August 2, 2015
Project Life
Happy Sunday! I wanted to share with you all a video I made last evening about Project Life. Stampin' Up teamed up with Becky Higgins from Project Life, and now offers a wonderful collection of kits and bundles we can enjoy to make the easiest and no fuss scrapbooking of memories and photos I have ever come across. You simply pop your photos into pockets, a card that journals into another pocket, and your page is done. You can embellish or leave it simple. Either way, it's guaranteed to look simply adorable!
If you are interested in looking at what Stampin' Up has to offer you can look over the online catalog. Please see the link above to shop 24/7!
If you are interested in looking at what Stampin' Up has to offer you can look over the online catalog. Please see the link above to shop 24/7!
Wednesday, July 29, 2015
Hexagons are Awesome
I want to share with you a card I made this evening. I found a card similar in the Stampin' Up! Catalog on page 105, and have seen many variations of it out in blog land. One in particular was at Julie's blog. I wanted to give it a try myself. I love the fact that many rubber stamps with Stampin' Up have coordinating paper punches that will easily punch the stamped image out. It's not only convenient, but it's also very fun!


Did you know that you can shop from my Stampin' Up store 24/7? If you place an order over $50.00 I will send you something special from me personally. If you place an order that equals $150 or more, you qualify for Stampin' Rewards and that means free products! Please look over the links at the top of my page because there are a lot of different options to consider.
I also am very excited to introduce my new:
Stampin' Club:
When 6 people have signed up and committed to spending a minimum of $25.00 each month (6 month commitment) in products (before shipping and handling) they will join our Stamp Club! How this works:
- Everyone will be assigned a month where they are "host"
- Everyone purchases a minimum of $25 by the 15th of each month using a unique hostess code provided by me.
- When it is your host month, all the credit will go towards your party. This is a good time to get your friends and family to purchase as well so your party totals more and you receive more Stampin' Rewards!
- I will send you a catalog where you can shop for your items, and keep you informed of any seasonal or promotional events. I will also send you tips, demos and fun projects to keep your ideas fresh.
Monday, July 27, 2015
Embossing is the BOSS!
I have to admit, it's been pretty fun the past few days, thinking and planning and scoping out new ideas to stamp. I have been a paper crafter for many years, including designing my own stamps, but admittedly, I didn't necessarily enjoy the process of stamping. (I know...it's quite shocking, really)!! But these past few weeks, I have really, really enjoyed playing with all my new Stampin' Up! toys and getting my fingers all ink stained. It's awesome! Some times my creations are pretty and I like them and other times I just toss it aside. We all have a standard, you know? But one of the things I really have enjoyed is scoping out other blogs, pinterest and places where I learn new techniques. Sometimes I just have to try and duplicate the creation because it's so pretty, or fun, or just want to try! I ran across a blog last night that I knew I wanted to CASE her project. Her name is Angie, and I know I am going to have fun looking through her ideas. Here is one I had to try!

Her example used different colored papers and inks, but I worked with what I had and I like the way it turned out. I embossed in white and then using a sponge dauber inked up the embossed images. Very fast and fun!
Did you know that you can shop from my Stampin' Up store 24/7? If you place an order over $50.00 I will send you something special from me personally. If you place an order that equals $150 or more, you qualify for Stampin' Rewards and that means free products! Please look over the links at the top of my page because there are a lot of different options to consider.
Sunday, July 26, 2015
Stampin' Club
Do you have a crafting wish list that is longer than your grocery list? Do you want to host a Stampin' Up! party but are worried no one would come, or you don't have time to plan for one...or maybe you quite simply don't feel like playing hostess in order to get what you'd like to have? I may have a solution for you!
Join my Stampin' Club:
When 6 people have signed up and committed to spending a minimum of $25.00 each month in products (before shipping and handling) they will join our Stamp Club! How this works:

Join my Stampin' Club:
When 6 people have signed up and committed to spending a minimum of $25.00 each month in products (before shipping and handling) they will join our Stamp Club! How this works:
- Everyone will be assigned a month where they are "host"
- Everyone will receive a catalog from me, to do their shopping
- Everyone purchases a minimum of $25 by the 15th of each month using a unique hostess code provided by me. (this will satisfy the $150 requirement to earn Stampin' Rewards!)
- When it is your host month, all the credit will go towards your party. This is a good time to get your friends and family to purchase as well, so your party totals more and you receive more Stampin' Rewards!

Thursday, July 23, 2015
Paper Pumpkin!
Hello Crafters! I am very excited to introduce you to Paper Pumpkin! I just signed up today for the monthly subscription that Stampin Up offers. Paper Pumpkin will come to your door once a month for a subscription price of $19.95. This even includes the shipping and handling. And now through Sept 10, 2015 you can receive the first 2 months for HALF OFF! Yes!! When you follow the link at the top of my blog, or via this link, enter the code: halfoff and you will automatically receive the 50% off. After the 2 months are over, you will revert back to the regular price. It's a great way to test the product out and see if it is as wonderful as I think it will be.

When I signed up to become a demonstrator I received a sample of a previous Paper Pumpkin kit. I opened it up and made a little video of what's inside. In advance I want to apologize for the quality of my video as well as the sound. It is time to purchase a new camera because the quality of this one has been affected. But, I wanted to get this offer out to you as soon as possible. So, if the video makes you crazy to watch...just follow the link and browse around and give it a try. Then, you can follow me as I receive mine and we can work on our projects together! YAY!
I also have the finished image of the project that came in this kit.


Saturday, July 18, 2015
What's in a Name?
If you have followed my blog in the past few years, you probably were already aware that I have gone by Heartstring Designs. I had picked that name up many years ago when I had to come up with a name and couldn't think of anything...so I went with it. As you may notice, I have a new look to my blog. A little simpler and a different name. Shelley Bean. That's the nickname my dad gave to me when I was a new born baby and I think I identify with that name better. Hence, the change. But, you can use the old address URL or the new...either way, it will get you to the same spot. And either way, I hope you continue to come visit. I have some things I am working on and look forward to sharing them with you.
Thursday, July 16, 2015
Butterfly Basics
I was looking through Pinterest the other evening and ran across some ideas for my new stamp set, Butterfly Basics. I love the idea of stamping in varying shades of the same color to get the depth that came across in this example, where I got the idea at this blog. I used Old Olive for my ferns and Blushing Bride for the contrast colors. I am very happy about the way it turned out. Please follow the links below if you'd like to check out the products used.


Wednesday, July 15, 2015
Official Announcement!
Since my mojo was way overdue for a new bout of energy, I have decided to take the plunge and become a consultant for Stampin Up! I love their products; the quality is fantastic and I like the idea of being creative and sharing that with all of you.
Please hop over to my store and look over the products now available. Very soon I will be sharing with you projects I am working on, videos and tutorials featuring their wonderful products. Maybe you will be interested in purchasing, or maybe you will just enjoy taking the opportunity to get some ideas that you can use for your own crafting adventures. Either way, I hope you will join me!
Please hop over to my store and look over the products now available. Very soon I will be sharing with you projects I am working on, videos and tutorials featuring their wonderful products. Maybe you will be interested in purchasing, or maybe you will just enjoy taking the opportunity to get some ideas that you can use for your own crafting adventures. Either way, I hope you will join me!
Friday, February 27, 2015
Pin Win or Pintrosity?
Hello Friends! It's been ages since I have blogged, let alone crafted anything. Thanks to pinterest and some searching I was doing to try and decorate my new sitting room I ran across an adorable little lampshade that was covered in rolled roses. Of course, I had to give it a try! Here is my finished lamp below. Pretty cute, isn't it?

Here is how I made it:
I started by going to my local fabric store and buying about 3 yards of an inexpensive sheer fabric. Along the selvage, I made 1"-1.5" snips. I then tore them off in one long strip that creates the frayed edge you see here.


Here is how it will look as the rose develops. I used the entire length of the fabric ribbon to make the standard size flower. If I found I needed a smaller ribbon I used less than the full length. This was helpful in filling in smaller areas that didn't quite fit together.

When I get to the end of the ribbon, I simply tucked the end behind the flower and glued down.

Here is the completed rose!

As you can see....this takes a lot of flowers....A lot. It's not a quick project to be sure, because the flowers are going to take some to create, but I do think the finished project is adorable! Tell me what you think?
Subscribe to:
Posts (Atom)